Pages

Marie's Fruit Salad

Marie's fruit salad


This is a great recipe. I think my Mother in Law made this WAY BACK WHEN for my bridal shower.  I haven't made it for a long time, and when her friends decided to throw her a surprise get together for her birthday, I said I would send this for them to enjoy.  I mean, I knew she would like it...it's HER recipe!

When I was making it, my daughter asked me "shower or funeral?" I said "WHAT?!" She said, you usually only make that for showers or when you need to bring something to church for a funeral.

Wow.

I mean it's a great recipe for either of these things, but seriously??


made and ready for the party


Marie's Fruit Salad

2 cans chunky pineapple
3 cans Mandarin oranges
1 large can sliced peaches
3 large bananas sliced
red graped sliced
3 heaping tablespoons Minute Tapioca
1 small box red jell-o
1 large box cookable vanilla pudding

Drain all of the fruit and reserve 4 cups of juice. Combine reserved juice with the jell-o pudding and tapioca in a saucepan.  Cook until thick. Cool.
Pour cooled mixture over the fruit and stir.

Ta-Da!! Easy Peasy...

reade more... Résuméabuiyad

Come Fly with Me... Let's Fly, Let's Fly Away....

My Mother-in-Law celebrated her 70th Birthday this past week. 

She had all kinds of different celebrations throughout the week of her birthday; lunches, golfing, dinners, movies, cookouts, but I bet not everyone gets to take a hot air balloon ride for their day!?!

up, up and away....

This past summer when we were around the camp fire one night the kids and parents and grandparents were playing "would you rather."

You know... "would you rather have a snake in your lap or a spider?"

You get the idea.

One of the questions was "hot air balloon ride or bungee jump?" Marie, my husband's mother, said Hot Air Balloon. She then went on to say that it had always been on her bucket list.  My father-in-law must have been listening, because he booked her a trip the Saturday morning after her birthday.  Friday night all of us kids took her to dinner, and afterward, he gave her the gift.


Marie, holding her surprise gift

the balloon/basket with the card attached

inside of the card

So, bright and early we arose the next morning, and left in the darkness to watch them take off on a sunrise balloon trip.


a picture perfect morning at the lake


inflating the balloon


my husband's parents look on as the balloon is filled with hot air


almost up....

It only took about 5-10 minutes for the giant balloon to be filled with air.  The company had two balloons for riders that morning. The weather was perfect for a balloon ride. Couldn't have asked for a better day.


climb on in! it's time!


a wave to the family down below and off they went into the wide blue yonder!


you can still barely see them


the sun came up as they drifted across the sky

We all decided it would be fun to follow the "chase vehicle" to the landing spot.  They would be in
the air approximately one hour. The balloon headed west, and so did we!  We stopped once along a dirt road in the middle of a cornfield to see it pass us by....

early morning haze over the cornfield


Shortly after this was taken, we drove for a little while longer to reach the spot where they would land. Right in these people's back yard!!


imagine waking up to that outside your window Saturday morning!

They said they had a wonderful trip, and now she gets to check that off of her bucket list.

Happy Birthday, Marie!!

after the landing
reade more... Résuméabuiyad

Double Chocolate Orange Cupcakes with Orange Butter Cream Frosting

double chocolate orange cupcake with orange butter cream

Sometimes you find a recipe that just screams your name, and this one did that for me!

A while back, Starbucks had an orange mocha. I guess it wasn't the hit for everyone that it was for me, and I am sure my waistline secretly thanks them all for that, but I sure do miss that coffee goodness!

When I ran across this recipe I knew I had to make it.  I had been wanting to make cupcakes in a jar, and this one seemed just perfect for the task at hand.

yumminess in a jar

When I mixed the batter up, I couldn't get over how THICK it was.  It was like scooping chocolate pudding into the cupcake liners!

When they baked, they were enormous!

warm out of the oven, delightful delectable chocolate

I made the first batch into regular cupcakes. I couldn't get over the light airy and yet oh so chocolaty cake!  Just when I was containing myself about that...I made the Orange Butter Cream!

As the kids say... OMG.

love how the flash made the streams of light behind it... I can almost hear the angels sing!

It was the first week of school and I was making these for the school carnival cake walk.  But I then decided it was a must to make some for my "girls." I have a little click of friends that we periodically have lunch throughout the school year.  I love to have a little something waiting for them at their place when they arrive for lunch. The last week of school it was the "Last Week of School Mom's Taxi Fuel" so I decided it was only fitting to have something special for them the first week BACK to school!

That special something was this divine cupcake in a crystal jelly jar!

in a jar with handmade tags

So, I know you're chanting...

 GIMME THE RECIPE! GIMME THE RECIPE!!

So settle down.... here you go! ;)


Double Chocolate Orange Cupcakes with Orange Butter Cream Frosting


The Cake:
1 (12-oz.) package NESTLÉ TOLL HOUSE Semisweet Chocolate Morsels, divided
1 (18.25-oz.) package German chocolate cake mix
4 large eggs
1/3 cup butter, melted
1 1/4 cups orange juice
1 teaspoon vanilla extract
 
1. Microwave 1 cup chocolate morsels in a 2-cup glass measuring cup at HIGH 1 minute, stirring after 30 seconds. Stir until smooth. Cool slightly.

2. Beat cake mix and next 3 ingredients at low speed with an electric mixer until moistened. Increase speed to medium, and beat 1 to 2 minutes or until well blended and smooth. Add melted chocolate and vanilla, beating until blended. Spoon batter by 1/4-cupfuls into paper baking cups in muffin pans.

3. Bake at 375° for 16 to 18 minutes or until a wooden pick inserted in center comes out clean. Let cool in pans on wire racks 5 minutes. Remove from pans, and cool completely on wire racks. Spread Orange Butter Cream Frosting evenly over cupcakes.

4. Place remaining chocolate morsels in a 1-qt. zip-top plastic freezer bag; seal bag. Microwave at MEDIUM (50% power) 45 seconds to 1 minute, turning bag over after 30 seconds. Squeeze chocolate in bag until smooth. Cut a tiny hole in 1 corner of bag. Pipe melted chocolate over Orange Butter Cream Frosting on cupcakes by gently squeezing bag.

The Frosting:
3/4 cup butter, softened
2 teaspoons grated orange rind
1 (16-oz.) package confectioners sugar
2 to 3 Tbsp. orange juice

1. Beat butter and orange rind at medium speed with an electric mixer until creamy. Gradually add confectioners sugar, beating until well blended.

2. Stir in 2 Tbsp. orange juice, adding additional orange juice, if necessary, to reach desired consistency
 
When I made the cupcakes in a jar, I cut the top of the cupcake off, and sank the bottom into the jar. I piped frosting over it, sprinkled chocolate chips, then added the top of the cupcake, piped more frosting and added more chips. Tied the fork onto the jar with a ribbon and cute little tag, and Viola!
 
Gifts fit for my sweet friends!


reade more... Résuméabuiyad

It's not your Mother's meatloaf... Stuffed Pepper Meatloaf


stuffed pepper meatloaf

It's that time of year when garden's are bursting with fresh veggies, and I don't know about you,  but I have been cooking with them constantly!  We must remind ourselves while we are sweltering in the heat and humidity now, that in like 4 short months we could be up to our apron strings in snow drifts! (at least where I live!!)  One of my favorite things to freeze from the garden for use all season long is bell peppers. 
This meatloaf is one of my kids' favorite!


When I was growing up I HATED meatloaf. Something about that hamburger all pressed together with bread and ketchup slathered on and baked...baked ketchup?

Gross.

Now I will say that I was one of those kids that ate pretty much everything growing up, but in those days you had to...or at least we had to... but either way I send a BIG thank you to my parents for being like that, you might not know what you re missing if it "just looks weird."

(Thanks, Mom and Dad!!)

I LOVED stuffed peppers growing up. That was one of my Dad's favorite meals, I was always excited when my Mom made them. So, I have incorporated that same taste into a meatloaf, and boy, is it a piece of cake...err...I mean, loaf?.... to make!

a view from the inside!


Stuffed Pepper Meatloaf

2 pounds ground beef
3/4 - 1 cup of instant rice
1 egg
1 can of diced tomatoes (undrained)
1 large bell pepper cut into rings
salt and pepper to taste

Combine ground beef, rice and egg to make into a "loaf." Season with salt and pepper. Place into your baking dish of choice, sprayed with non-stick cooking spray. 

I usually make mine in my Pampered Chef deep baker (thanks, Angela!) instead of a loaf pan, because it does have some liquid from the tomatoes around it, and I don't want anyone blaming me for making their oven dirty! ;) 
I have also made it in an 11x7.

Pour the undrained can of tomatoes over the meatloaf. Place the pepper rings over the top, cover either with the dish's lid or with foil and bake at 350 for 90 minutes.

stuffed pepper meatloaf, baked potatoes and sweet corn

I always make green beans and baked potatoes with it, not only does it taste awesome, but your oven is already on!!
Since I am a creature of habit, this picture looks weird to me, because we had fresh sweet corn that night, but again, can't pass up the chance for the fresh stuff this time of year!
Enjoy!
reade more... Résuméabuiyad

Canning Tomato Sauces


So many different flavors!!


I heart home grown tomatoes

I will begin this blog by saying that I have a new appreciation for my grandmothers.  We ALWAYS had quarts of canned tomatoes in our basement.  My grandmas always supplied them. 

Wow. 

That's a lot of work. 

I have "put away" vegetables lots of times, corn, tomatoes, peppers, but I have always frozen them.  This year, my good friend, Betsy, asked me to come and can some with her.  I had seen this post from a fellow blogger about basil garlic tomatoes, and shared it with her. She was all ready to join the fun!

Her and her THREE 5-gallon buckets of Roma tomatoes!!

We decided that while we were making one kind, we might as well experiment.  Her spice garden was doing phenomenally this year, so we went to town!

the first two sauces as they came out of the canner


We picked from her spice garden, fresh basil, thyme, oregano and rosemary. I wish I would have taken pictures of all of the herbs!!

They all smelled amazing!!

Now, I will begin by telling you that we didn't measure anything, we made all of these sauces by taste. So, I will tell you how we did it and what is in each one, but you will just need to do it following your own taste buds.

First we washed all of the tomatoes, again we used almost all Roma ones. 


cute lil tomato butt, we can't use you!

Then we quartered them and put them in a blender, liquefied them and poured them into a big soup pot. Then we turned the heat up and let them cook down.  I have to say when they get big pink fluffy foam on top you wonder what you have gotten yourself into!! Ha!

We added a little sea salt and pepper, and when the "pink foam" was gone and the sauce was thickened, we transferred them to canning jars and cooked them to seal them.  One more thing, before we put the sauce in the jars, make sure that you add 1 Tablespoon of lemon juice to each pint sized canning jar for citric acid.


my half of the sauces we made


We made four different sauces: Basil & Garlic, Pizza, Spaghetti and Chili.

Here is the spices we added to each, while the tomatoes were cooking on the stove in the soup pot.

Basil and Garlic

For this one, we just did a base sauce with salt and pepper, and then when it was placed in jars we added fresh basil leaves (4-5 per pint jar) and 2 cloves of garlic.  They would be cooked during the sealing process for 40 minutes, you can remove them or blend them in when it comes time to cook with them.

Pizza

This one we did in smaller jelly jars.  This one had chopped garlic, oregano and basil added to the base sauce while it simmered. I think this one is my favorite, it smelled AMAZING!

Wish blogs had a scratch and sniff...

Spaghetti

We called this one spaghetti, but it would be a good base pasta sauce for about anything.  This one started again with the base sauce, we added chopped onion, garlic, thyme, rosemary and basil. 
 Once it simmered down,

(every time I say that I here this one teacher i had in grade school saying 
"Class.... Simma down now!")

we used a hand blender and pureed all of the onions into the sauce.

Chili

For the chili sauce we used the base sauce and added a little more cracked seasoned pepper corn. Then some red pepper flakes. It had a really nice subtle spice to it, that way if you want to have a milder chili you haven't already spiced it too much.

We figured that using minimal amounts of salt would be good, too. You can always add more, right?

Well, it took Betsy and I from 8:15 AM until 2:15 PM to can all of these, but I had SO MUCH FUN and learned SO MUCH! I thank her for teaching me one more thing... I am lucky to have her as a friend, she pretty much knows how to do EVERYTHING! ;)  Next week... peach ginger jelly!

Yay!!


reade more... Résuméabuiyad

7 Facts Blogger Game

There is a fun game going around the food blogging community called 7 Facts. If you get tagged by someone, there are seven questions you have to answer using previous posts from your blog.

I was tagged by Candi, from The Devilish Dish.  Thank you!
 
Here are my seven answers based on my previous blog posts and experiences.


Click on Recipe Title to be taken to the Recipe Link!


1. Most Beautiful Post
 
"Dream a Little Dream" Dinner,  Dance and Auction 2011
 
I would have to say that this is the most beautiful post that I have ever done, simply because the whole evening was just downright beautiful!  I was the decorating chair for our Parish's annual Dinner, Dance and Auction this past year. I had a ball doing all of the decorations! Then I was lucky enough to have a professional photographer do all of the pictures for me!


2. Most Popular Post
 
"Little King Salad" -It's like a Hoagie Sandwich in a Bowl!

This post was so popular!! I have people land on this one almost on a daily basis. This salad is SO DARN good, even guys who are not salad guys, will be okay here!


3. Most Controversial

"NO BOYS ALLOWED - "Pink Lemonade Cupcakes"

The only thing that I would say that is "controversial" about this post, is the name!
I wrote this post when my boys and my nephews were at the farm for a "boys only" visit with their grandparents. While they were away, I had all of the girls to our house, where I treated them with make your own pizzas, movie night, sleepover and these awesome pink lemonade cupcakes!
Just between us, we saved some for the boys, and they loved them just as much as the girls did!


4. Most Helpful

Home Made Play-Doh, but we call it "Josie Doh"

Not sure how helpful it was to my "cyber-friends" but it sure helped my then second grader make lots of pretend money at the school store! This was a great recipe for homemade play-doh, and it didn't have to be refrigerated. It's a fun thing to do with your kiddos!


5. Surprisingly Successful Post

That mystery dish I named "Chicken Fajita Bake"

I don't know why I was surprised by this? It was one of those "make something out of what's in the house" kind of meals. I threw it together in a pinch, and it turned out amazing! I am really glad I wrote down what was in it, so I could make it again!


6. Didn't get quite the attention it deserved


I thought this one would have a a million hits.  Not only does it look super pretty, it has hooch in it!
I am pretty sure if I could have cyber taste tested this one, like in those little Starbucks sample cups they have... ya'll would have come back for thirds!! ;)


7. Post that I am Most Proud of

"Confirmation and Graduation Brunch"  for my oldest daughter

It's not really the actual blog that made this one that I am super proud of. 
It was the actual event; My daughter's 8th grade graduation and her Confirmation. 
I had like 25 people for brunch all in my kitchen.  The food was all prepared by me, set on table with linens and nice dinnerware. Everyone was treated like they were dining somewhere fancy for brunch.  I enjoyed it all,  from the selecting of the recipes, to the making of the centerpieces, from folding the napkins like bishop hats, to all of the food that I prepared.
I actually even timed all of the baking right...I was really sweating that one!
My only goof up... not taking a picture of the baked apple french toast casserole. Oops. Come to think of it...I STILL haven't blogged all of the recipes for this brunch... hummmm.... something to look forward to! :)
Well, and of course, I am proud of my daughter!

Now, my job it to tag 6 other bloggers to do the same thing! Here is who I have chosen:


Looking forward to seeing all of your 7 Facts in the blogger game!


reade more... Résuméabuiyad

Just peachy! Peach Crisp Recipe

I have had this recipe on the brain ALL day today.  This morning a fellow blogger was asking for peach recipes. I have a crisp recipe that is just to die for! So, when I commented on her post about what I would do if I had an abundance of peaches laying around, all I could do was think of that crisp!

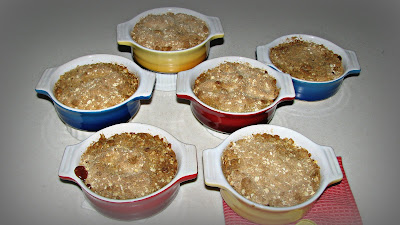
 peach crisp

Low and behold, I was at the grocery store, like I seem to be about 5 days a week, and peaches were not only cheap, but they smelled wonderful!! I gave in to my craving and picked a bunch up.

Now this recipe is written for apples, but I have made it with all kinds of fruits, peaches is by far one of the better choices. But you see, it's not so much what kind of fruit you choose, the crumb topping is just so darn good, it makes them all tasty!

Normally I make this in a 9 x 13 pan, but I had purchased these cute little crocks to use for french onion soup this winter, and they were so stinkin' cute I decided to use them for the crisp, to give them a test drive. Aren't they precious??

cute little crocks

I'm not sure what was going on with the flash on my camera, but it super exposed all of the pictures tonight? I only have one crock left, but I promised it to my oldest who is out whooping it up before school starts, so these pictures will just have to suffice.


I will write the recipe as I have it, for apples.  Make changes as needed.


Apple Crisp

2 T flour
1/2 c sugar
1 t cinnamon
1/4 t salt
7 c sliced apples

Topping:
2 c oatmeal
2 c flour
1/2 t baking soda
1/2 t baking powder
1 t cinnamon
2 c brown sugar
1 1/3 butter

In a bowl, combine topping ingredients, working with fingertips until mixture is crumbly. Reserve.
Stir together flour, sugar, cinnamon and salt in a large bowl. Halve and core apples, peel and slice.  Toss the apples with the cinnamon flour mixture. Spread apples evenly into a greased 9x10 pan.
Sprinkle topping over apples.
Bake at 350 degrees for 30-40 minutes or until brown.  Serve warm or cold. Top with ice cream.

For the peach crisp, I used the same amount of fruit, and I used everything except the salt.  I have made this many different ways, would love to know if you make it, what you used!

One more over exposed picture that didn't do this melting ice cream on warm crisp justice...
trust me, it tasted terrific!

peach crisp with vanilla ice cream

reade more... Résuméabuiyad

Grandma Jane's Peanut Butter Cookies

I consider myself very lucky to be a stay-at-home-mom. When I was growing up, my Mom was always at home for us, and I loved that. If you have followed my blog at all, you have probably noticed that I speak of her a lot. My Mom is one of the most special and inspirational people in my life. Not only is she my Mom, she is my very best friend. I can go to her about anything. She is always there for me to laugh with, cry with, and give me direction when I am lost. (even when that means giving me a good swift kick in the fanny!!)  Maybe that is why when I was growing up, and in school they would ask the kids "what do you want to be when you grow up?" Kids would shout "doctor!" "teacher!" "fireman!"  What did I always say? "I want to be a Mom." She gives me big shoes to fill, but someday I hope that my kids can look back on their childhood and think that my "job" as their Mom was important.


grandma jane's peanut butter cookies

It was always a special day when my brother and I walked home from school to find that my Mom had baked something for our after school snack. You knew it the second you walked in the door and were greeted by that scent only something sweet baking in the oven can make!  I have lots of favorite things that my Mom makes, they are very much my "comfort foods." We all have them.  One of mine, her peanut butter cookies! I don't know what it is, but these are the BEST peanut butter cookies I have ever had.  Today I had just that craving. 

Time to share with you!!


Grandma Jane's Peanut Butter Cookies

1 cup shortening
1 cup peanut butter
1 cup sugar
1 cup brown sugar
2 eggs
2 1/2 cups flour
1 1/2 teaspoons baking soda
1 teaspoon baking powder
1/2 teaspoon  salt

Preheat oven to 375 degrees. Mix the above ingredients together.  Drop rounded ball shapes onto an ungreased cookie sheet.  Dip the tines of a fork into granulated sugar and "cris-cross" them onto the cookie. (you could also use a cookie stamp)  Bake for 8-10 minutes. Watch them closely, because in order for them to be soft and chewy, you can't over bake them! When the edges are brown, it's time to take them out.  Leave them on the cookie sheet for a minute or two before removing to a cooling rack.

Enjoy!


my mom and I in her kitchen
reade more... Résuméabuiyad

Sourdough and Sausage Breakfast Casserole and a gift "from the heart"

Most of you have probably heard that my friend, Candi, from The Devilish Dish came to visit me this past week.  We try very hard to get together at least once a year, and this year we were fortunate to see each other twice..and hey...the year's only a little more than half over right?

Well this year, she was able to bring her daughter with her.  It was fun for our kids to get acquainted.  We were so busy this trip, that we ate out a lot while she was here, but I did manage to make brunch on Sunday!  This recipe is one of my favorites. My Mom and I made it for my cousin's bridal shower a year ago, and it's been one of my family's favorites since.

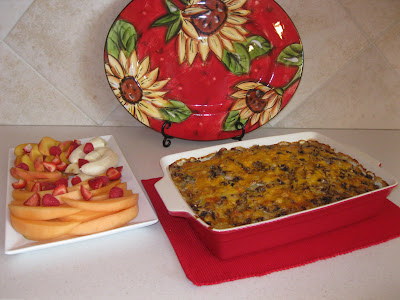
sourdough sausage breakfast casserole

The tang of the sourdough bread with the spiciness of the sausage with the richness of the fresh mushrooms sets this casserole apart from all of the others.
serve with a plate of fresh fruit and the meal is complete


Sourdough and Sausage Breakfast Casserole

4-6 slices sourdough bread

2 cups cheddar cheese, shredded

2 lb. bulk breakfast sausage

1/4-1/2 tsp. red pepper flakes

1 tsp. dry mustard

8 eggs

2 ¼ cups milk

4 green onions, diced

1 can of cream of mushroom soup

¼ lb. fresh mushrooms ( I us a little more)

1/3 cup milk

Cherry tomatoes, halved (optional)


Grease bottom of a 9x13 baking pan. Cover the bottom of the pan with sourdough bread slices. Use just enough to cover the bottom. Sprinkle cheddar cheese over the bread. Brown the sausage with the red pepper flakes, drain, and let cool slightly. Sausage should be well crumbled. Place on top of cheese. In a large bowl, mix eggs, dry mustard, 2 ¼ cups milk, and onions. Pour this over bread, cheese and sausage. Cover and refrigerate overnight. Preheat oven to 350 degrees. Mix cream of mushroom soup with 1/3 cup milk and the mushrooms, and pour over casserole. Sprinkle with more cheese and bake uncovered for 1 hour. Let stand 5-10 minutes. Garnish with tomatoes. Cut into squares and serve.

shown here without the tomatoes
 
 
Candi and I have a lot of fun sending "fun mail" back and forth to each other. When I see her, she always brings me some special little treat.  This year was no exception. She had this beautifully decorated package, inside was a darling apron with cupcakes all over it!
 So cute and such a reflection of my current profile picture on my facebook page.
 
 
such cute wrapping
 
 
Then she did something that was so touching. Many of you who know me, know that not only do we have four children, but we have two "fur babies." We have a Westie named Gabby and a boxer named Sully.


gabby
 
sully

Our boxer, Sully, had two masses removed a couple of weeks ago. When they put Sully under he had a pretty bad seizure. After they got through that, the procedure seemed to go well, but he was not being very good about his suture.  He ripped out the first set of stitches, they replaced them with staples, he ripped some of those out, more staples.  After wearing "the cone of shame" for 10 days, they were finally removed.  We received the pathology reports, and they told us that our sweet little brown boy had cancer. I was beside myself.  I spent the better part of our trip last week wishing I was home with him.  When Candi came to visit, she brought me this candle, with the prayer to St. Rocco on it.


prayer candle to st. rocco

Candi is a big dog lover. Sully has always held a special place in her heart though, because she, too, has a dog that is a boxer mix.  Sully and her dog, Ruth, have so many similarities in there personalities. Candi has always affectionately called Sully her "brown boyfriend."

The day Candi left I got to meet with our vet about treatment for Sully.  She had just gone over the path results with the oncologist. The oncologist told her that she had removed all of both tumors and had gotten great margins.  The cancer was GONE!! No further treatment was needed, and he should be just fine.

Thank you to all of my friends and family for your prayers for our sweet little Sully!!


reade more... Résuméabuiyad